Backing up virtual environments with VMware
Tuesday, 04 August, 2009
When VMware released vSphere, they also included a new product called VMware Data Recovery (VDR), which is their first entry into the virtual machine (VM) backup arena. Unlike VMware Consolidated Backup (VCB), which is an enabling technology and not an actual data backup product, VMware Data Recovery is a standalone product that creates hot backups of virtual machines to any virtual disk storage attached to an ESX/ESXi host, or to any NFS/CIFS network storage server or device and is not meant as a replacement for VMware Consolidated Backup
An additional feature of VMware Data Recovery is its ability to provide data deduplication to reduce storage requirements using block-based in-line destination deduplication technology that VMware developed. This means that duplicate data is found at the block level instead of the file level while it is being streamed to the destination disk and the deduplication process occurs as the data is stored on the destination disk. The deduplication feature cannot be disabled so all backups done by VDR are deduplicated.
VMware Data Recovery is built using the new vStorage API's in vSphere and is not compatible with VI3 hosts and virtual machines. The vStorage API enables backup tools to connect directly to ESX hosts without additional software and enables backup tools to do incremental, differential and full-image backups of virtual machines. VMware Data Recovery is integrated with vCenter Server and can back up virtual machines even when they are moved to other hosts by VMotion and VMware Distributed Resource Scheduler (DRS). VMware Data Recovery is available only in the Essentials Plus, Advanced, Enterprise and Enterprise Plus vSphere editions. It comes packaged as a plug-in for vCenter Server/vSphere Client and a prebuilt OVF format backup appliance that runs on your host servers (you can run multiple backup appliances). It can only do backups at the virtual machine level (VM image) and does not do file-level backups; full backups are initially performed and subsequent backups are incremental. It does have individual file-level restore (FLR) capability that is currently considered experimental that requires a special client and can only restore files to virtual machines running a Windows XP/Vista/2003/2008 guest operating system. The FLR utility is a command-line application that mounts the virtual disk from a selected VM/restore point to a Windows drive letter so the files can be accessed and copied.
VMware Data Recovery vs. Veeam Backup and Replication
VMware's VMware Data Recovery product directly competes with several third-party vendors, including those from Veeam Software (Backup and Replication), PHD Virtual Technologies (esXpress) and Vizioncore Inc. (vRanger). However, VDR is a pretty basic, first-generation backup product and more suited for SMBs. While its basic functionality is similar to the other more mature products, it lacks the polish, advanced features and scalability that other products such as Veeam Backup and Replication offer. The chart below shows the major differences between the two products.
|
VMware Data Recovery vs. Veeam Backup and Replication |
|
|
VMware Data Recovery |
Veeam Backup and Replication |
|
Supports only vSphere ESX/ESXi hosts |
Supports both VI3 and vSphere ESX/ESXi hosts |
|
Does not support multiple vCenter Servers or standalone hosts not managed by a vCenter Server |
Supports multiple vCenter Servers and standalone hosts |
|
Supports only 100 virtual machines per backup appliance and 2 TB of source data |
Supports 100-plus virtual machines and unlimited source data |
|
Basic backup scheduling |
Allows for very granular backup scheduling |
|
File-level recovery is experimental and only supported on Windows systems |
Mature file-level recovery for both Linux and Windows systems |
|
Performs backups only, no replication |
Performs both VM backups and replication |
|
Performs block level, inline data deduplication |
Performs block level, inline data deduplication |
As you can see, the major differences between the two products are in the support for host and operating system versions, replication support, scalability and usability. Because of its limitations, VMware Data Recovery may not be a good fit for organisations that have large numbers of virtual machines, large amounts of virtual data storage or running predominantly Linux virtual machines. Despite its limitations, VDR is still a good choice for SMBs that want to augment their current backup solution or perform disaster recovery backups. Due to its limited support for individual file restores, it may not be a good solution as a primary or solo backup method.
Installation of VMware Data Recovery
Now that we know a bit about VMware Data Recovery, I will walk you installing and using the product. The system requirements are fairly simple. First you must be using vSphere; this includes vCenter Server 4.0 and ESX and ESXi 4.0 hosts. As mentioned earlier, you cannot use VDR without a vCenter Server. The release notes and documentation currently do not reference ESXi at all, but it does supports ESXi (except for the free edition). You also need some storage to use for your target data store; this can be any type of storage attached to an ESX/ESXi host (local, SAN, iSCSI, NFS) or any NFS/CIFS network storage server or device.
Once you are ready to begin, follow the steps below to install and set up VDR:
- Download the VMware Data Recovery from VMware's website. There are three downloads available. The first is an 759 MB ISO file that is used to install the vSphere plug-in and deploy the VDR appliance, the ISO file also contains the install for vShield Zones. The second is the experimental file level restore client (Windows only) and the last is the documentation for the file level restore client.
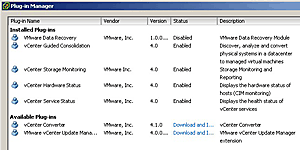
- You can burn the ISO file to a physical DVD or mount it to a virtual CD-ROM. The autorun program will bring up an installer wizard that will install the VDR plug-in to the vSphere Client on the server/workstation that you run it on; it does not install the VDR appliance that must be installed manually later on. Optionally, you can copy and run the VMwareDataRecoveryPlugin.msi file from the ISO/DVD and run it separately. The wizard is very simple, just hit "Next" a few times and the plug-in will be installed. Once installed you start your vSphere Client and select Plug-ins from the top menu and then Manage Plug-ins, you will see the new plug-in installed (click on illustrations below for full image).
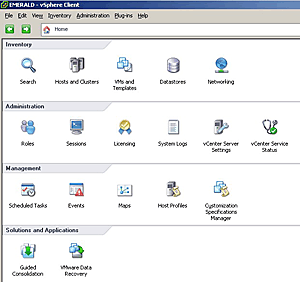
- You can enable the plug-in by right-clicking on it and choosing "Enable." Once it is enabled you will see a new option on the "Home" screen under "Solutions and Applications" called VMware Data Recovery. If you click on it, you will see a screen that will prompt you to connect to a VDR backup appliance -- since we don't have one installed yet we will have to do that next. Note that the VDR plug-in connects to the backup appliance using port 22024 so be sure that port is open in any firewalls between the system running the vSphere client and the backup appliance.
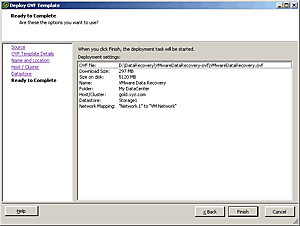
- To deploy the appliance, you use the vSphere Client and use the Open Virtualisation Format (OVF) template from the ISO/DVD file to create a new virtual machine. Since the OVF template is on the ISO/DVD, you will need it to deploy the template. In the vSphere Client select "File" from the top menu and then "Deploy OVF Template." The wizard will load and the first screen is to select the source, click the Browse button and select the VMwareDataRecovery.ovf file located in the \DataRecovery\VMwareDataRecovery-ovf directory. Click "Next" and it will display the template information. While the actual template is only 297 MB, the virtual disk size of the virtual machine that is created on the specified host will be about 5 GB. Click "Next" and then give the VM a name or keep the default, continue through the screens selecting a destination Datacenter/Host/Resource pool and finally a storage volume and click "Finish" at the final Summary screen to begin the creation of the VDR appliance on your host server.
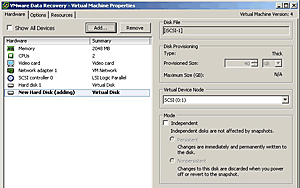
- If you want to store your backups on a storage volume connected to the host that the VM is located on then you should edit the settings for the newly created VM and add an additional virtual disk to it to store your backups on, this can be any storage type that is configured on your ESX host. One thing to keep in mind when creating the virtual disk is the block size of the VMFS volume that you will create it on, the default 1 MB block size only allows for a maximum virtual disk size of 256 GB. If you need a larger disk size you will need to use a volume with a 2 MB or larger block size so you can create larger virtual disks on it. If you want to store your backups on a network storage device such as a CFIS share you can skip this step and move onto the next one.
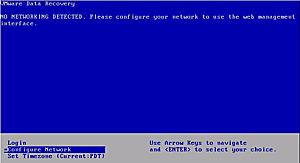
- Before you power on the VDR appliance, you should edit the settings and make sure the NIC for the VM is connected to your desired network. The VDR appliance is configured to automatically obtain an IP address using DHCP but if it isn't available, you can change this when it first boots up. The appliance is built using the CentOS Release 5.2 Linux operating system and when you power it on you will see the familiar Linux boot sequence. Select the Configure Network option and you can enter your IP address and network settings. Optionally, you can login to the appliance using the default username root and password vmwa@re and change the password using the passwd command.
- Once the appliance is powered on and the network configured, you can connect to it using a Web browser using the URL https://:5480 (note you must use https). In the Web interface, you can only do basic things like viewing system information, view/change network settings and reboot/shutdown the appliance.
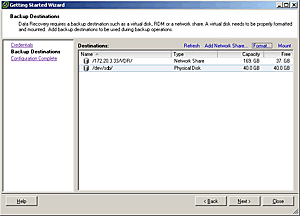
- The main interface for managing the VDR appliance is the plug-in in the vSphere Client. Click the Home link and then click the VMware Data Recovery link and you will be presented with a prompt to connect to a VDR appliance. Enter the IP address/host name of the VDR appliance and click the "Connect" button. You will be prompting to enter login credentials for the vCenter Server (not the VDR appliance). After your login credentials, your backup destinations will be displayed, this includes any virtual disks that you added to the VDR appliance and you can also add network shares. If you choose to add a network share you must use the IP address of the server (i.e., \\172.200.100.55\share) and not the host name (\\server\share), this is specified in the release notes. You can use the "Refresh" button to display any disks that you recently added to the VM that are not showing up.
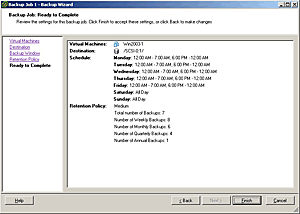
- Before you can use a virtual disk (not a network share) you need to format it, once formatted it will show as a local volume instead of a physical disk and the name will change to scsi:x:y. Once you are done with your backup destinations click "Next" and you will be at the Configuration Complete screen. If you check the box to create a backup job and click the "Close" button, a new wizard will open letting you create a backup job. In the Backup Job wizard you can specify the virtual machines/virtual disks to be backed up, the destination, backup scheduling and the retention policy. The backup window is the most important setting and you should know how it works, VDR will attempt to back up your VM in the specified window (not at a specific time) and if the backup does not complete in that window the backup will stop and be restarted when the window occurs again. So, if you specify many virtual machines to be backed up during a window it's possible that some may not get backed up due to resource/time constraints. Only a maximum of eight virtual machines can be backed up concurrently but multiple backups will only happen if CPU utilisation is less than 80%. VDR will give higher priority to the VMs that did not get backed up in subsequent backup windows.
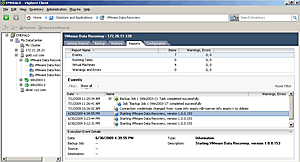
- Once you are done with the wizard, you will be at the main VDR screen where you can choose different tabs to manage backups, restores, reporting and appliance configuration. The "Backup" tab will show all your jobs and which are not in compliance, you can start a backup immediately by selecting a job and choosing the "Bring to Compliance" option. The "Restore" tab will show all your completed backups and available restore points. You can choose to do either a restore which will replace the selected virtual machine or a restore rehearsal which will create another copy of the virtual machine and not replace the original. Restore rehearsals are a good way to test that your backups are working and that you can restore them if needed. The "Reports" tab shows you event and status data and the "Configuration" tab lets you configure the appliance and manage backup destinations. Here you can also see the free space on your destinations, mount/unmount, extend and check the integrity of them.
If you plan on using VMware Data Recovery then you should make sure you understand it thoroughly and read the administration guide and the release notes, which contain many known issues that you may encounter. Also be sure and download and install the File Level Recovery utility and test it out so you know how to use it when it comes time to restore files. VDR is a new 1.0 product and therefore may have some issues until it matures it a bit and new versions are released. But overall it's a pretty solid entry-level backup application that is great for organisations that want to add additional backup and recovery options to their virtual environment.
The future of security lies in prevention, not reaction
Businesses have two choices: rely on outdated security approaches and react to threats as they...
The digital horizon: tracking security trends
Today's technological reality requires new ways of thinking about infrastructure, security...
Why Australia will play a pioneering role in 2025's tech innovation
How Australia can lead global innovation in the coming years by becoming a tech powerhouse.

